
This screen is used to create a new time or expense entry and review detailed information about an individual time or expense entry. This is where administrators and project managers can review the details about a particular entry such as the tax, cost status and rate being charged. Project team members will most likely be recording their time and expense items in either the Time screen or Expense screen.
When you create a new time or expense entry from a project, your user name and the project are automatically entered. You then select from the available phases for active projects and job codes. The date for the entry, the entry type (that is, time or expense), hours worked (can be manually recorded or the timer can be used), and a task description, are also recorded. Expense entries also allow for excluding a predefined project expense markup ($ or %), and making an item non-reimbursable.
Not all users can see the information displayed on this screen. Certain users cannot see financial data such as the billable rate, total before tax, total after tax, buttons to apply a tax model or cost rate. In addition, only privileged users can delete time entries, or edit time entries for other users. If the optional workflow process is engaged for this project, then an authorized user can review and approve the entry so that it can be billed.
The fields displayed on this screen change based on the selected entry type (that is, time or expense).
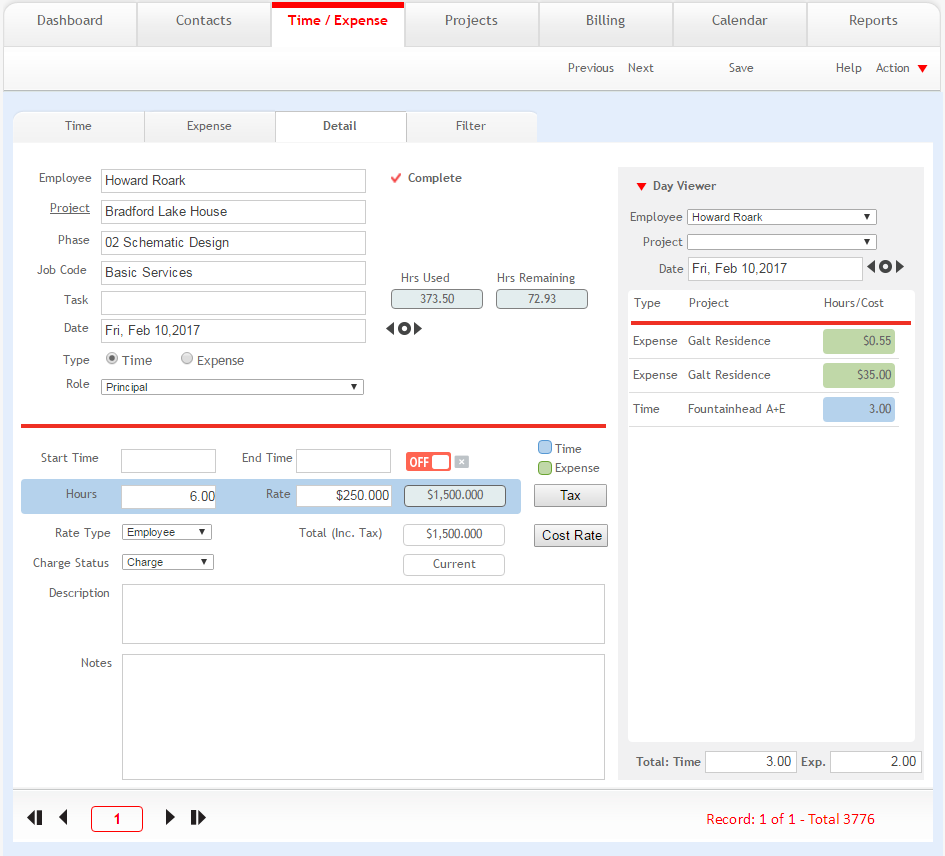
Employee:
Name of the employee for whom the time and expense details are being entered or viewed. The employee can be changed by users with privileges to enter time entries for other employees.
Project:
The project for which the entry is made. You can choose a project from the drop-down list. Only the employee's active projects will be available. On clicking the Project link, you are redirected toward the project details.
Phase:
The project phase with which the time and expense entry is to be associated. Only active phases for the chosen project are available.
Job Code:
The job code associated with this time and expense entry. Only active and associated job codes for the chosen phase will be available.
Task:
The task associated with the chosen phase/code, which the time and expense entry is to be associated with. This option is only visible if the selected project is set to use tasks for time.
Date:
Date of the time or expense entry recorded. The current date displays by default.
Type:
Specify whether the entry is a time or expense. The fields to be displayed further in the screen depend on the type selected here.
Role:
Select the role of the employee from the drop-down list. This option is only visible if the entry type is set to time.
Expense Type:
Select the type of the expense being entered from the drop-down list. This is only visible if the entry type is set to expense.
Emp Reimbursable:
Select this check box to designate that an employee can be reimbursed for expenses.
Client Non Reimbursable:
Select this check box when a client-related expense will not be reimbursed by the client. When an expense is marked as non-reimbursable, it will not show up or be included in the value of an invoice. When you create the next invoice that covers this time period, this expense entry will be marked billed and associated with that invoice number, but it will not show up or count towards anything on that invoice.
Apply Markup:
Select this check box to allow a markup amount to be added to the expense.
The Apply Markup check box can be toggled on or off for all entries in the current found set by selecting Apply Markup or Remove Markup from the Update drop-down list in the Time/Expense - List View.
Hrs Used
Displays the total hours the employee has worked on the relevant Project Phase/job Code.
Hrs Remaining
Displays the hours the employee has to complete work on the relevant Project Phase/Job Code as set up in the project budget. This value is negative if no project budget has been entered.
Start/End Time
Click the ON button to start the timer displaying the starting time or click the OFF button to stop the timer displaying the stop time. The time which has lapsed will then be entered automatically in the Hours field. This option is only visible if the entry type is set to time.
Receipt![]() :
:
Click ![]() to attach a scanned receipt to the expense
entry.
to attach a scanned receipt to the expense
entry.
Hours/Qty:
For a time entry, specify the hours worked. For an expense entry, specify the quantity of expenses incurred.
Rate:
For time entries, specify the billing rate of the employee. Restricted employees will not see the rate. For expense entries, specify the rate that each quantity is billed at.
Rate Type:
Specify whether the rate type is fixed rate or as specified by the employee.
Total Inc. Tax:
This read-only fee displays the income tax based on the current tax settings and cost rate.
Tax:
Click this button to change tax details (for example, tax method, PST or GST rate).
Cost Rate:
Click this button to create a new cost rate for the entry.
Charge Status
Specify the charge status as one of the following:
Charge: billable to the client and able to appear on an invoice.
No Charge: non-billable to the client and displays on the invoice. The extended amount displays as No Charge. The fee goes against the cost of the project.
Hold: non-billable to the client and does not appear on the invoice. The fee goes against the cost of the project.
Status:
Click this link to change the status of the entry. This allows you to effectively mark an entry as billed by selecting an existing invoice to associate this entry with.
Description:
Enter descriptive details on the time and expense entry. Information entered in this field will appear on the invoice if using itemized billing for hourly or additional services.
Notes:
Add additional comments or details in this field. Information entered in this field will not appear on this invoice, but will be for internal purposes only.
Day Viewer
This panel displays a list of all time or expense entries made by the selected employee on a selected date. You can choose to view time or expense entries for a particular employee or project. Click the panel's header to hide or display it.
Entry Status:
X |
Displays until all required time or expense information is completed by you. |
|
Displays when the required information has been entered. |
A |
If the workflow process is being used, this status indicates the entry has been reviewed and approved. |
|
Displays for time or expense that have been billed. When billed, the time and expense entries cannot be edited. |
H |
Displays for time or expenses that have been placed on hold to reflect the time as non-billable to the project or to be released for billing at a later time. |
D |
Displays for those entries that are currently rendered on a draft invoice. When included on a draft invoice, the entry cannot be edited unless you delete that invoice. |
N |
Displays for time entries that are marked as no-charge items. |
Button Panel
Previous:
Click to display the previous time and expense record.
Next:
Click to display the next time and expense record.
Save:
Click to save time and expense entry details.
Help:
Opens the ArchiOffice Online Help in the Time/Expense section.
Action
New:
Select to create a new time or expense entry in Detail view. You can also enter time and expenses from the Time screen and Expense screen, respectively.
Duplicate:
Select to duplicate the current time or expense entry in view.
Delete:
Select to delete the selected time or expense entry.
List:
Select to view a list of active time and expense entries.
Find:
Select to search for time or expense entries.
Re-Find:
Select to go to the search view and modify a previous search requests.

