
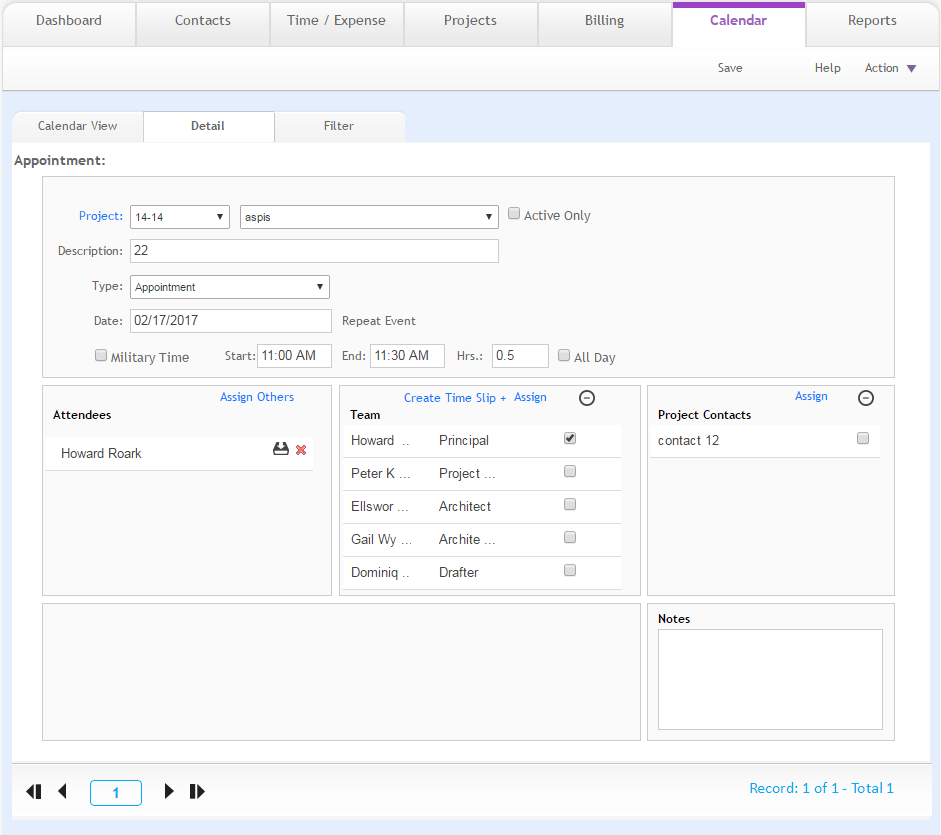
The Calendar-Detail screen shows information about the event such as the project, event, date, time, creator, notes, and who is invited to the event. The event could be a repeating event.
Event Details
Project:
Select the number or name of the project for which the event is being scheduled. Click the field label to go to the selected project. If desired, you can filter by active projects only by checking the Active box. If an event is recorded against a ‘non’ active project and Active check box is selected, the Project drop-down will list this project apart from the active projects as a special case.
Description:
Enter the event name.
Type:
Specify the type of item you are scheduling (that is, To-Do, Milestone, and Appointment).
Pending/Achieved/Done:
A milestone and To-Do items have a default status of pending. When the milestone has been reached, click Pending, or select the adjacent check box, to change the status to Achieved. When Pending is clicked for a To-Do item, the status changes to Done.
Date:
Enter the date of the scheduled item. If you select Today from the calendar, it represents today's date of the client system (not the server system).
Repeat Event:
Click this hyperlink to create or delete recurring events.
Military Time:
Check this option to enter time in the military format (24-hour).
Start/End:
Specify the event's start and end time.
Hrs:
Displays the duration of the scheduled event in hours.
All Day:
Select this check box to schedule an event that spans all day.
Attendees:
Displays the contacts attending the event. Click Delete ![]() to remove the attendees.
You can also click the Assign Others
link to add additional contacts to the event.
to remove the attendees.
You can also click the Assign Others
link to add additional contacts to the event.
Team:
Displays the team assigned to the project for which the calendar item
is being scheduled. Click the Assign
link to add selected team members to the event's attendees list. Click
Delete ![]() to remove a team. Click Create
Time Slip + to create a time entry for the
event.
to remove a team. Click Create
Time Slip + to create a time entry for the
event.
Project Contacts:
Select the check box of a listed project contact you want to invite to the event. Click the Assign link to add project contacts to the event's attendees list. When creating a new event, ArchiOffice Online pre-fills the default contact name but you can change it.
Notes:
Enter notes regarding an event in this field.
Button Panel
Save:
Click to save the event settings.
Help:
Opens the ArchiOffice Online Help in the Calendar section.
Action
New:
Select to create a new event.
Delete:
Select to delete an event. This option is only available for users with the proper security privileges.
 If an event selected
for deletion is a recurring event, you will be prompted to delete the
single event or all future events.
If an event selected
for deletion is a recurring event, you will be prompted to delete the
single event or all future events.
Duplicate:
Select to create a duplicate event.
My List:
Select to view a list of events assigned to you.
List:
Select to view a list of all events.
Find:
Select to locate event's matching specific criteria. The resulting Found Set displays in the List View.
Re-Find:
Select to return to the last Find criteria so you can modify the requests before executing the search.
 If no tasks assigned to a project (at the project level),
the Task field does not show a drop-down and can be used to
enter description relevant to the time entry.
If no tasks assigned to a project (at the project level),
the Task field does not show a drop-down and can be used to
enter description relevant to the time entry.